Muramatsu converts a Mauser to .45 ACP in this two-part series. Why, you ask? The best reason of all: It’s fun.
Some of the coolest things in the gun world are those with no serious application. Or perhaps those applications are in the eye of the beholder. One of the neatest things I have seen is a conversion for an old favorite that is little more than just plain fun. But that’s good enough for me. I figured if I needed a “sporting” use for it, I could take it swamp buck hunting with some XTPs.
All You Really Need is Raw Material
It used to be, in the olden days of gunsmithing, that gunsmiths were customizing and sporterizing a myriad of used (sometimes very) military rifle. Carcanos, Arisakas, Enfields, and Springfields were cut down, welded, gutted, rechambered and rebarreled, sighted and scoped. However, the most customized rifles were probably the Mausers. Okay, yes the Springfields and Arisakas were derived from Mausers, derived being the key word. Mausers didn’t have those stupid magazine cutoffs or the ridiculously difficult safeties.
Mausers came back from Europe by the thousands. Unfortunately, the 7.92x57mm (8mm Mauser) ammunition to shoot through them was not as plentiful, so many, many of these Mausers were rebarreled or rechambered to shoot something more easily appropriated: .30-06 Springfield, 8mm-06, .270 Winchester come to mind. Interestingly enough, many years later when your humble author was in gunsmithing school, he came upon one of his fellow students turning a Mauser into a .45 ACP with a kit that he purchased online. That kit is no longer available, but I figured it wouldn’t be all that difficult to replicate one on my own from scratch.
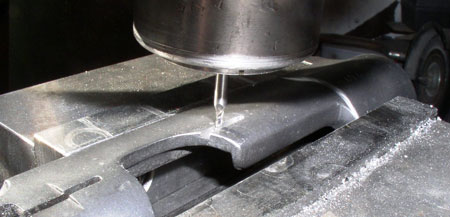
I want to point out that unlike most of the stuff done in this column, to do this project involved heavy use of a lathe and mill. I also removed the original magazine floor plate, spring, and follower and tossed these and the retaining button into the gunsmith packrat box.
How Am I Going to Do This?
First off was the easiest part of the whole procedure. The case head diameter of a .45 ACP is only slightly larger than an 8mm Mauser. Using a Dremel tool with a small grinding stone, I ground off a touch from the extractor claw, just enough so that a .45 ACP case would stay held in its grasp.
The second task was to brainstorm how to feed the ammo. Most gun owners will readily acknowledge that other than the case head, .45 ACP and 8mm Mauser aren’t even close to being similar. Like in the old kit, I decided to use 1911 magazines as a feeding device because of availability and compactness. I needed to construct a magazine well block that would fit into the original magazine box on the gun yet have a magazine well of its own inside it to accept the 1911 mags.
I needed to figure out a mag catch too. Well, what I had available was a big block of Delrin plastic. I milled it out to roughly the right size for the magazine well dimensions but oversized by about 10 percent. I then cut it in half. Using a 9/16-inch ball-end mill I cut lengthwise the magazine channel (at a 14-degree angle to match the angle in the 1911 pistol), intending to use the rear half of the block to form the back of the mag well only.
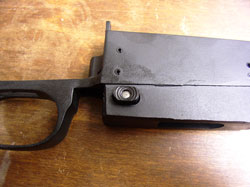
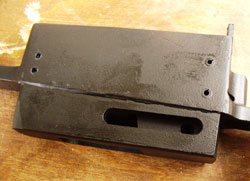
This worked out pretty well and was an easy way to cut the channel. I was then able to carefully use a belt sander to precisely shape both sides together to match the channel, and tightly fit the block to the mag well. I then fastened this block to the mag well of the Mauser by drilling two 1/8-inch holes in both the front and rear of the mag well and pushing through four roll pins. The block protrudes about ¾ of an inch below the bottom of the mag well, and thus the stock, but I thought that it looked too skinny and rough. So I fastened two sheets of smooth plastic, one on each side, to the block using an epoxy. After the epoxy had cured, I again touched up the whole assembly on a belt sander.
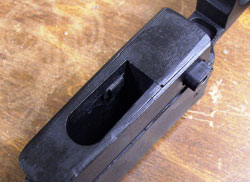
Now to make this feed properly, I had to make the magazine sit so that the feed lips were just below the closed bolt of the rifle, but high enough so that the bottom of the bolt face could catch the top of the first cartridge in the magazine. I had already decided to use an AR-15 magazine catch assembly, just to see if I could pull it off. I simply machined the slot out of the left side of the block and drilled through to the right side for the post of the mag catch. On the right side, using the drilled hole as a starter, I milled the ovoid hole for the button and then opened the hole up with a 1/4-inch drill until it came to within 3/32 of an inch of the slot in the left side.
This deeper wider hole was to accommodate the mag catch spring. I had to shorten the spring by half to make it fit properly, as this whole assembly is about half the width of the AR-15’s mag well. After assuring that this mag catch would function properly, I removed it and inserted the magazine to the proper depth. Looking through the slot, I was able to mark on the magazine with a scribe where the mag catch slot was located. I then removed the magazine and with the mill, machined a small slot at the scribed location. Fancy that, it even worked. Inserting the magazine into the new mag well should be smooth without too much wobble and some friction should be apparent from the magazine catch until the catch snaps into place in its slot. I did find that the slot I cut was too wide, so I decided that I did indeed need a stop to keep the magazine from going all the way through the action when the bolt was open.
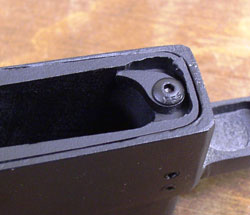
I dug out a hole in the front left “corner” of the mag well at the top, just deep enough to be level with the notch in that portion of the magazine. This notch is intended to give clearance for the slide stop in the 1911 pistol, but in this case provided a satisfactory point to place a magazine stop. I used a scrap piece of steel (in fact, a useless, used and worn AR-15 disconnector), ground down to the proper shape on the belt sander. I used the original trigger pin hole as a screw hole with which to fasten it to the magazine block. I duplicated the radius of the magazine front to allow it to protrude just slightly into the magazine well. After drilling and tapping this hole into the block I screwed down the new mag stop and inserted the magazine to check the fit. It stuck out a little too much.
So, using a Dremel tool with a grinding stone, I shortened it just enough so that it would interfere with none of the cartridge dummies in the magazine. With the magazine set in the well, there was a very small amount of “jiggle” play, which turned out to be insignificant. The bolt perfectly stripped dummies off the magazine when pushed forward. In fact, once the dummy cleared the feed lips of the mag, the follower literally popped the dummy right up underneath the extractor. This was a pleasant surprise. It was inordinately fun to fill up the magazine well with dummies and cycle them through the action to let them fall out the front of the action. Sometimes it just feels good to do things right.
I then finished off the whole assembly with Matte Black Alumahyde II from Brownells. This turned the appearance from warmed over junk to a halfway decent looking gun assembly. Convenient too, since it is an aerosol and doesn’t require baking, which was good since a significant amount of the assembly was plastic.
So, What’s Next?
So now that the magazine block was complete, and it even worked, I needed to move on to the next step. I decided to leave the barreling until last. One of the experiments I decided to conduct was to shorten the bolt throw and move the ejector forward so it was just behind the new magazine well. And of course this little piece wouldn’t be complete without a completely unneeded muzzle break to help tame the mighty recoil. We’ll detail all this and more in the next excursion into the world of gun goodness.
Click Here to Read Part 2 of Project 45 ACP Mauser

Next Step: Get your FREE Printable Target Pack
Enhance your shooting precision with our 62 MOA Targets, perfect for rifles and handguns. Crafted in collaboration with Storm Tactical for accuracy and versatility.
Subscribe to the Gun Digest email newsletter and get your downloadable target pack sent straight to your inbox. Stay updated with the latest firearms info in the industry.


